Tuesday, August 27, 2013

Pepperoni Rolls- A WV Tradition

Pepperoni-Roll
Pepperoni Roll
 
 
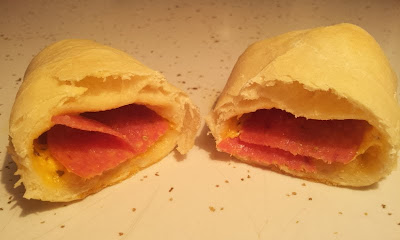
     What, may you ask, is a Pepperoni Roll?  Huh! I gasp in horror.  Doesn't everyone know what a Pepperoni Roll is?  Well surprisingly it turns out the answer is an astounding, NO.  A quick snack that many of us West Virginians grew up eating is really only known to the people of this great state.  Your mother made them, your grandmother made them, hell even the local gas station had them on their shelves. Once you cross the mountainous border you will most likely never find this delicious snack.
 
     So, a quick history lesson on what makes the Pepperoni Roll so fascinating.  When the mines were booming in the state of WV local Italians from the Fairmont area needed a quick snack to carry down into the earth with them that they could quickly eat.  They decided to take some of the traditional food items that they would find in their kitchens: bread, pepperoni, and sometimes cheese.  That's it.  Roll up the ingredients, bake, and viola you have the fantastic Pepperoni Roll.  This version of the traditional roll I made from a quick bread dough recipe I have in my stash.  Below is the recipe for not only the dough but also how to quickly combine the flavors that make a Pepperoni Roll a wonderful snack.
 
Ingredients:
  • 2 tsp rapid yeast
  • 1-cup warm water
  • 1 tbs sugar
  • 3 cups flour
  • 2 tbs olive oil
  • 2 tsp salt
  • Pepperoni slices
  • Mozzarella cheese
  • Dried oregano
     Add water, yeast, sugar, and 1/2-cup flour in a bowl.  Mix and sit aside for 20 minutes.  It will start to bubble and froth up. Next add the oil, salt, and 2 more cups of flour.  Mix and turn out on floured surface.  Need while adding the rest of the flour for about 5 minutes.  Form dough into a ball, place in oiled bowl, cover and let sit for 2 hours.  At this point the dough will have doubled in size.  Punch down and place in a plastic bag and refrigerate overnight.  


     When ready to make the rolls remove dough from fridge about half an hour prior.  Cut off chunks of dough about the size of a bit larger than a golf ball.  Roll out onto floured surface, place some pepperoni slices on top, a pinch of oregano, and top with your favorite shredded cheese.  Pull dough around over top and place seem side down in a greased pan.  Cover and sit until the rolls rise again.  Place in 350-degree oven and bake until golden brown.  Makes roughly a dozen rolls.


Monday, August 26, 2013

Fish Tacos

 
Fish-Tacos
Fish Tacos


      I have heard that Fish Tacos are something that originated in California.  Since living in WV is far from California, you might ask how someone like me found these delightful little meals.  Well, traveling and trying new things introduced me to the Fish Taco.  I'm one of those people that once I get the hankering for something I plan and organize to make it that night or weekend.  So, here goes, I was craving Fish Tacos surprisingly and decided to give it a try and attempt to make them.  Never having done this before it turned out to be very simple and quick. Previous Fish Tacos that I have had included a slaw type of topping.  I was craving a good cold black bean salsa so I threw it in instead.  If you are not a fan of fish and think the idea of making it into a taco is repulsive, please just open your mind and mouth and give this a shot.  It will not disappoint you.  Trust me....  Fish Tacos.

Ingredients:

  • 2 filets of Swai
  • Panko crumbs
  • 2 eggs
  • Flour
  • 1/2 15oz can corn
  • 1/2 15oz can black beans
  • 1 10oz can Ro-Tel tomatoes/jalapenos
  • 1/2 cup cut green onion
  • 9-12 fresh white corn tortilla
  • 1 tbs cumin
  • 1/2 tbs garlic powder
  • 4 tbs mayo
  • 1 tbs chili pepper
  • 1/2 tbs cayenne
  • 1/2 tbs dill

     First prepare the fish by slicing the filets into small strips and then coating in some flour, dredging in egg, then into the panko crumbs. Fry in a skillet in a little olive oil until golden brown on both sides.  Place in an ovenproof baking dish and bake at 350 degrees for about 15-20 minutes.  Meanwhile mix the mayo, the cayenne, chili, and dill in a bowl based on taste.

     In a small frying pan brown the white corn tortillas in a little oil on both sides until they start to bubble and blacken.  Remove to a plate and fold to cool.


     Mix the corn, beans, and can of Ro-Tel, cumin, and garlic powder together and sit aside.  Once the fish is complete it is time to plate.  Take some of the mayo concoction and spread inside the taco shell.  Place in a piece of fish and top with the black bean corn salsa.  Serve immediately while the tacos shells are a bit crisp and soft.  Enjoy my take on Fish Tacos.  Serves 3-6 people based on the size of their stomachs.


Wednesday, August 21, 2013

1/2 CARAFE of Wining And Dining


     As with a few of my posts, this one has to do with a great "recipe" for local fun, dining, and relaxation.  Not too far from where I live there are a few different wineries.  Now I know what you are thinking, "Does WV have the climate for good wine making?" Your answer is yes.  Just about an hour away from my hometown sits a little farm where they make their own wine and whiskey's.  Along with taste testing their fruit of the land they also have an upscale fine dining venue that one can enjoy while experiencing some good flavors of libations.

     An old friend of mine from high school had called me up and was in town and wanted to drive on up for the evening, meet up with another friend from school, and have a great night of wine tasting and dining.  Who was I to turn down an evening with great friends, great food, great wine, and even better spirits?  As it turns out an old friend from high school and her husband own the place and we were lucky enough to have them show us a great evening and how they give their own spin on the meaning of hospitality.

     It was just a normal Tuesday evening after work that we decided to head on the road for the very short hour drive up to Heston Farms in Fairmont, WV.  Not that hard to find, the farm sits right off the exit on Interstate 79.  Short couple miles up this road up a hill and "Ta Da!" you are there.  The winery/ restaurant has this very attractive open garden in front with a stage off to the right where they allow live bands and musicians to perform for the entertainment of the diners and tasters.

     Walk through this garden entrance and enter the front door where you are greeted with a sort of rock cavern where the tasting occurs.  The walls are lined with wine bottles, whiskey, and homemade items for sell.  To the front sits a long counter where one can taste the multitude of homemade wines and whiskey's they have right at your disposal. 


     Off to the left is an indoor dining area followed by a walkway that leads upstairs to more indoor dining.

     My friend and I did a little wine and whiskey tasting before heading out to our table in the front garden area where we were joined by our other friends/owners of this fine establishment.


Good meal with good friends
 
     The menu from the Foxfire Restaurant within the farm ranges from appetizers, main courses, desserts, to even sandwiches.  The variety of different items goes from Filets of choice beef, pastas, grilled items, seafood, etc.  The upscale dining experience is quite good and we definitely ate our share of a couple different items.

     By the end of the evening we were all stuffed and feeling pretty good all thanks to our gracious hosts and good company.  What better way to enjoy an evening out but tasting what your local area can provide you. 


     If you are in the mood for great food, great wine, and even better company please check out Heston Farms website at http://hestonfarm.com/ and try your hand at a wonderful WV winery. No recipe can beat what your local environment can provide straight from the earth to your table.


Monday, August 19, 2013

Poppy Seed Chicken

Poppy-Seed-Chicken
Poppy Seed Chicken

     What better meal to throw together than a simple casserole.  I typically cannot stand casserole dishes.  I don't know what it is about them, I think it is the different concoctions that people throw together and bake in a dish, and the weird tastes that they have.  Either way, this dish is a good one.  It was inspired by a friend of mine, Jamie, who used to love this dish in college. She gave me a simple recipe, and I mixed it up a bit and added my own take on it.  So here goes, my version of a Poppy Seed Chicken.

Ingredients:

  • 2 small chicken breasts
  • 1 10oz can cream of chicken
  • 8 oz sour cream
  • 1 cup uncooked egg noodles
  • 1 tbs ranch powder seasoning
  • 1 tsp garlic powder
  • 2 tbs poppy seeds
  • 1 sleeve of Ritz cracker crushed
  • Salt/pepper

     Precook chicken by boiling it in water and dicing it up into bite size chunks. Cook the egg noodles as directed on box, drain, and sit aside. Mix together the cream of chicken, sour cream, ranch dressing powder, garlic powder, 1tbs poppy seeds, and some salt and pepper for taste. Stir in the cooked noodles and the chopped up chicken.  In a bag smash up the Ritz crackers and add the last tablespoon of poppy seeds. Spread the chicken mixture into a casserole dish and top with the cracker mixture.  Place in a 350 degree oven and bake uncovered for about 20-30 minutes.  Serves about 4-5 people.


Monday, August 12, 2013

Bachelor's BLT Grilled Cheese

BLT-Grilled-Cheese
BLT Grilled Cheese

      A grilled cheese has to be the easiest thing a Bachelor like me can make. Who doesn't like a good grilled cheese?  Turn it into a gourmet meal and you have a fantastic sandwich that you can share and even be proud of.  Now you can say I made an amazing grilled cheese.  The possibilities are limitless to what you can do to a plan old grilled cheese sandwich.  I decided tonight to take a classic American sandwich and turn it up a notch.  The classic BLT turned grilled cheese popped into my head.  I know what you’re thinking, this has been done before, but who cares, this is my take on it.  Fresh cooked bacon, fresh garden lettuce, a spiced up mayo, and good melted cheese, what could be better?  This serves just one but all you need to do is just increase the amounts for each additional sandwich.  Please enjoy my BLT Grilled Cheese.

Ingredients:

  • 2 slices of rye bread
  • 4 strips of bacon
  • Fresh garden lettuce
  • 2 slices of provolone
  • Mayo
  • Chili pepper
  • Cayenne pepper
  • 2 slices of tomato

      First cook the bacon in a skillet as you like it.  I prefer mine a bit chewy but with just the right amount of crisp. Remove and drain on paper towel lined plate.  Next take some mayo and the chili pepper, cayenne pepper and mix until you have a nice spicy mayo.  (Base the amounts on your own preference).  Lay out the bread, spread on some mayo, lay down the bacon slices, the sliced tomato, some lettuce and the cheese.  Any order is fine.  Place the top layer on and grill on a Panini press until nice and crisp.  Viola!  A very inexpensive, gourmet style, BLT Grilled Cheese.


Wednesday, August 7, 2013

Pulled Pork: An American Classic

Pulled-Pork
Pulled Pork
     When I think of "American" cuisine, some of the first things to come to mind are; Hamburgers, Hotdogs, BBQ ribs, Fried Chicken, Maryland Crab Cakes, and of course Pulled Pork BBQ Sandwiches.  What better southern dish to have on a nice summer afternoon then a juicy pulled pork sandwich with coleslaw and a side of sweet potato fries. Pulled Pork is one of those dishes that takes some time to find the best combination of flavors for your pulled pork sandwich.  I am giving away my personal secret here for my recipe so consider yourself lucky. Another trick is the best way to cook your pork to get that perfect pull apart, juicy, and tender pork that just soaks up your sauce and is full of flavor. Now this is a non-traditional recipe where all the ingredients are based on "eye balling it".  I've mentioned this method in my previous BBQ post.  Just start with a small palm full of each ingredient then adding more based on your taste preferences.  Give it a try.  Just remember to base it on your own tastes.
 
DRY RUB:
  • Paprika
  • Chili powder
  • Garlic powder
  • Onion powder
  • Cayenne pepper powder
  • Brown sugar
  • Salt/Pepper
Mix all ingredients together based on taste and sit aside.

     As with the dry rub, the sauce is all based on "eye balling it" again.  This time just start with a tablespoon of each one and build it up based on tastes.

BBQ SAUCE:

  • Molasses
  • Brown sugar
  • Honey
  • Ketchup
  • Mustard
  • Balsamic vinegar
  • Liquid smoke
  • Garlic Powder
  • Chili flakes

Mix all ingredients together and sit aside in a squirt bottle if handy.

     Now I use a method I learned on the Internet for getting that smoked flavor of good pulled pork.  Since I don't own a smoker and my grill is too small, I smoke mine in my oven.  You have to know ahead when you want to have the pork completed to eat to know how to time the cooking of it.  I rub my dry rub all over the pork shoulder.  I then place my pork into a Dutch oven.  I place a small ramekin of water and liquid smoke within the Dutch oven next to the roast.  Place the lid on it and place in a 210-degree oven.  Cook for 8-10 hours checking half way through the process to make sure there is still liquid in the ramekin.  When you pull this out of the oven you will be amazed at how easily it is to remove from the Dutch Oven.  The pork just falls apart.  I place it on a wooden cutting board and barely but gently cut into it with a knife breaking up some of the large chunks.  There is very little fat left as it has melted down into the meat.  Mix in a couple drops of liquid smoke and some of the BBQ sauce and you're ready to serve.  Serve this on a nice seeded bun, top with some of the BBQ sauce, and homemade coleslaw and you have yourself and amazing summer BBQ Pulled Pork Sandwich.  Serves about 8-10 people.


Tuesday, August 6, 2013

Ras El Hanout Chicken -(Moroccan Chicken Dish)


Moroccan-Chicken


     So my friends at foodies+ on Google+, specifically Azlin Bloor, had posed the question to all of us to make a dish for the Ramadan and the Eid feast.  I, being adventurous and willing to try new things, decided I too would like to participate and agreed to give it a try and make something special.  So here is my entry into the world of Moroccan cuisine.  Here is my take on a traditional Moroccan dish using a spice mixture you will find in Moroccan cuisine; Ras El Hanout.  Ras El Hanout is a combination of a bunch of spices such as: cardamom, cinnamon, clove, chili pepper, coriander, cumin, turmeric, and a bunch more depending on the provider of the rub.  This recipe was given to me by my friend Azlin Bloor to test and try out for the Eid feast.  I must say it was very simple and packed full of flavor.  I accompanied it with an olive oil and roasted garlic couscous.  Please enjoy my take on Ras El Hanout Chicken.

Ingredients:

  • 2 boneless chicken breasts
  • 2 tbs olive oil
  • 2 tbs Ras El Hanout rub
  • 1 fresh thyme sprig
  • 2 cloves of crushed garlic
  • 1/2 white onion
  • 1/2 green bell pepper
  • 2 cups chicken stock
  • 1/4 cup of fresh lemon juice
  • Salt/pepper

     The night before I planned on cooking this I placed the chicken breasts in a Ziploc bag and added 2 tbs of olive oil, the Ras El Hanout rub, 2 cloves of crushed garlic, and the leaves from the sprig of thyme.  Some salt and pepper and I mixed it up and let it marinate overnight in the fridge. 

     The day of cooking I took the chicken out of the bag and browned in a large sauté pan in a little oil then removed. In same pan I took the 1/2 white onion cut into strips and the green pepper cut into strips and sautéed until tender.  Poured in the 2 cups of chicken stock, the lemon juice, and the marinade left over in the bag and brought to a boil.  Place the chicken back into the pan and simmered on medium heat for about 30-45 minutes.  Served over some fresh garlic and olive oil couscous and you have an amazing dish representing Moroccan cuisine and the Eid feast.  I must say the aromas coming out of my kitchen were fantastic.  The tastes of the multiple spices complimented each other on the chicken.  Thank you Azlin!!